
To build a DIY outdoor kitchen on a budget, start by planning your layout using free design tools or printable plans, focusing on zones for cooking, prepping, and storage. Use affordable, durable materials like pressure-treated wood, concrete blocks, and pavers for the structure and countertops. Opt for essential appliances and consider used or DIY options to save money. Get creative with repurposed furniture and inexpensive storage solutions. Keep it simple and functional, and you’ll create a great space without overspending—there’s more to discover to make it even better.
Key Takeaways
- Create detailed plans and layouts to visualize your space and avoid costly trial-and-error adjustments.
- Use affordable, durable materials like pressure-treated wood, concrete blocks, or pavers for framing and surfaces.
- Prioritize essential appliances, such as a quality grill, and consider used or refurbished options to save money.
- DIY countertops with concrete or veneer finishes, ensuring weather resistance and proper sealing.
- Incorporate repurposed and budget-friendly storage solutions, seating, and minimalistic design to maximize functionality and style.
Creating a DIY outdoor kitchen on a budget is a practical way to enjoy cooking and entertaining outside without breaking the bank. The key is careful planning. Start by creating a detailed layout or blueprint before any construction begins. Use free design software or printable plans to visualize your space and make adjustments easily, saving you money on trial-and-error. Pay close attention to appliance dimensions to ensure proper openings and countertop thickness. Designate specific zones for cooking, prepping, storage, and dining to streamline your workflow and make your outdoor kitchen more functional. Planning for future upgrades now can help you avoid costly modifications later. Researching affordable materials and DIY techniques can further reduce costs and enhance your project’s success.
Careful planning and layout are essential for an affordable, functional outdoor kitchen.
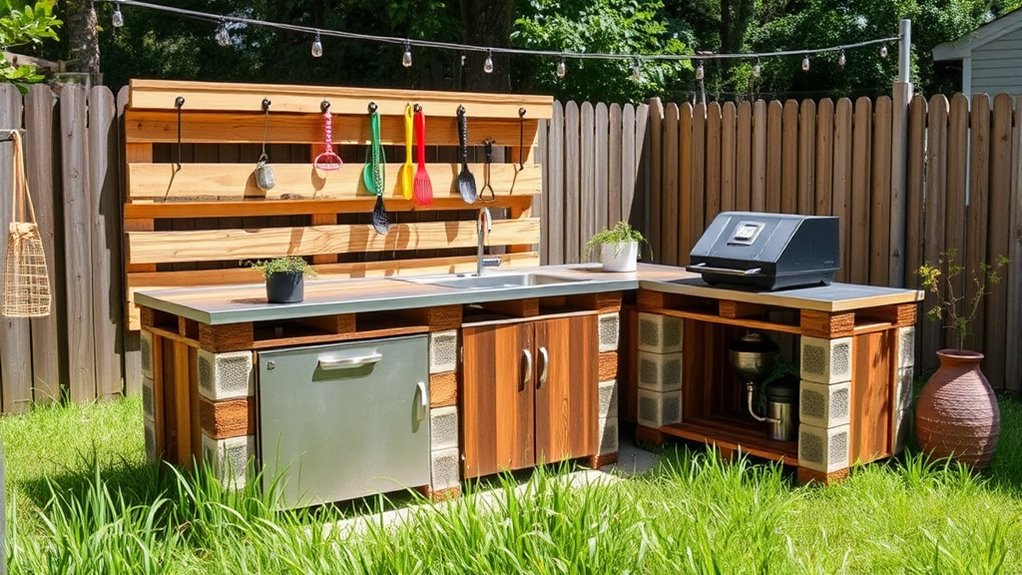
When it comes to framing, choose materials that balance durability with cost. Wood is usually the easiest and most affordable option, especially for beginners. Opt for pressure-treated lumber, which resists rot and withstands outdoor conditions. If you prefer metal, stainless steel or aluminum studs are good options, but they may require welding or screwing together. Concrete blocks are durable and budget-friendly but need masonry skills for proper assembly and footing. Incorporating cross supports will add stability and ensure the frame matches the depth of your grill island, making your structure more secure.
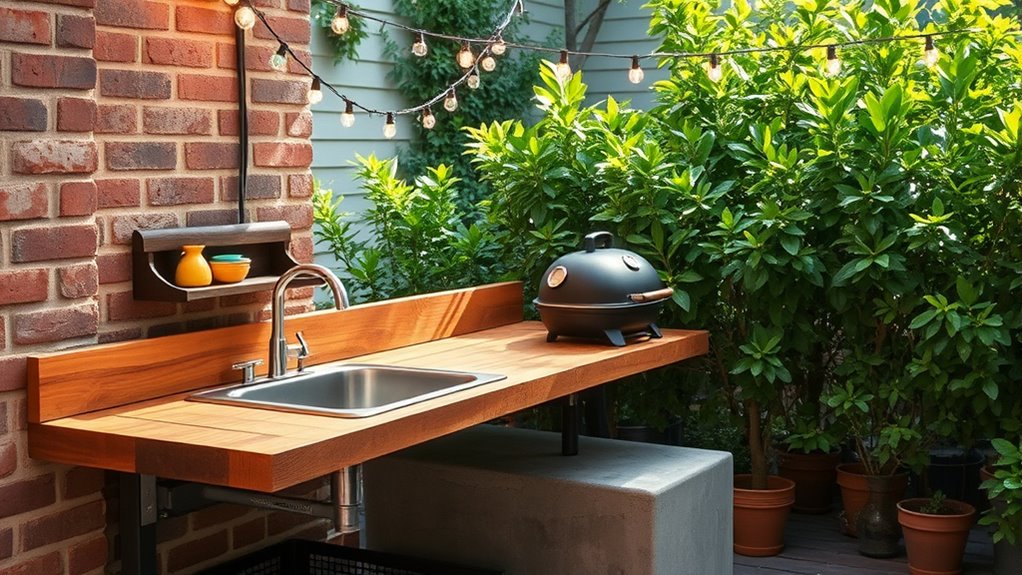
Countertops and surfaces are another area where you can save. Concrete blocks and pavers serve as inexpensive alternatives to pricey natural stone. DIY concrete countertops are a popular choice—forming and sealing them yourself can drastically cut costs. For veneer finishes, consider stucco, stone veneer, or tile, which add visual appeal without a hefty price tag. Make sure your countertops are weather-resistant and sealed against moisture to prevent damage. During framing, leave the countertop height slightly lower than your final desired height to account for material thickness, ensuring a comfortable workspace.
Choosing appliances and fixtures on a budget involves prioritizing what you need most. A quality grill is the core element—look for affordable charcoal or compact gas models that perform well without the premium price. Buying used or refurbished appliances can also save a lot. You can skip optional items like sinks or mini-fridges initially, adding them later as your budget allows. Stick to basic, durable fixtures and hardware instead of luxury-grade elements to keep costs down.
For storage and workspace solutions, get creative with inexpensive materials. Use repurposed wood, metal racks, or even old furniture for shelving and work surfaces. Mason jars, plastic bins, or pegboards work well for organizing utensils and spices without spending much. Keep your setup simple but functional, ensuring your storage is weather-resistant and easy to clean. Minimalism in your workspace reduces clutter and makes meal prep easier.
Finally, economize your seating and dining area with budget-friendly options like picnic tables, benches, or pallets repurposed as outdoor seating. These options are inexpensive, durable, and easy to assemble, making your outdoor kitchen inviting without overspending. By focusing on smart planning, affordable materials, and DIY solutions, you can build a functional outdoor kitchen that fits your budget and enhances your outdoor living space.
Frequently Asked Questions
What Are the Best Cost-Effective Materials for Outdoor Countertops?
You wanna choose cost-effective materials for outdoor countertops? Consider concrete, as it’s affordable, customizable, and durable, perfect for DIY projects. Tile offers variety and easy replacement, making it budget-friendly. Soapstone is nonporous and low-maintenance, while bluestone and limestone give a natural look without breaking the bank. Stainless steel is durable and sleek, ideal if you want a modern touch. Prioritize durability and maintenance to get the best value for your budget.
How Can I Ensure Proper Drainage for My Outdoor Kitchen?
To guarantee proper drainage, start by evaluating your space for natural slopes that help water flow away. Choose a drainage system like French drains or dry wells based on your soil and location. Install pipes with a slight slope (about 1/4 inch per foot) to prevent standing water. Regularly inspect and clean your system, and avoid disposing of food waste into drains to prevent clogs and odors.
What Safety Precautions Should I Consider During Construction?
You might think construction is straightforward, but safety is vital. You should maintain a 10-foot distance between grills and combustible materials, keep flammable items away from heat sources, and install fire extinguishers nearby. Use non-combustible materials for your structure, guarantee proper electrical safety with GFCI outlets, and include ventilation to prevent heat buildup. Always test gas lines for leaks and work with qualified electricians to prevent accidents.
How Do I Choose the Right Location for My Outdoor Kitchen?
When choosing the right spot for your outdoor kitchen, think about proximity to your indoor kitchen—aim for 10-15 meters for easy access. Make certain there’s good flow to dining and relaxing areas, with safe pathways. Position it near utilities like water, gas, and electricity, but keep a safe distance from your house. Consider wind, shade, privacy, and weather protection to make it comfortable and functional year-round.
Are There Any Permits or Regulations I Need to Be Aware Of?
You should check if you need permits or follow local regulations before building your outdoor kitchen. Most projects don’t require a permit unless you’re doing major electrical, plumbing, or structural work. Call your local building department to confirm requirements, especially for electrical and gas installations. Also, check HOA rules and zoning laws to avoid fines or removal. Hiring licensed professionals for electrical and plumbing work helps guarantee safety and compliance.
Conclusion
So, there you have it—your fancy new outdoor kitchen, all on a budget. Who knew you’d be turning backyard chaos into a culinary paradise without breaking the bank? Now, every BBQ feels like a five-star event, and your neighbors will wonder how you pulled it off. Enjoy your masterpiece of DIY ingenuity—just don’t forget to invite them over once it’s all done. After all, what’s a kitchen without some good company and a little irony?